Another fish crusted in a corn product

December 30, 2009

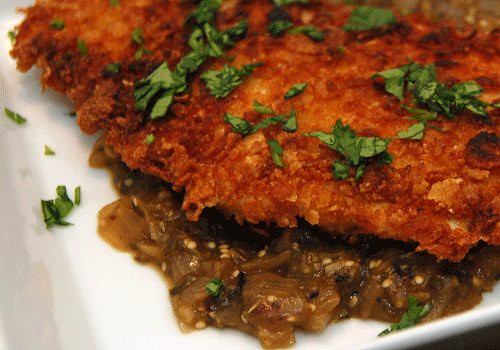
I'm originally from western Pennsylvania where every dive bar competes to serves the most gigantic fried fish sandwich. This means I am conditioned to prefer my sea critters with a crunchy coating. (In fact just an hour ago I ate a salad with fried fish on it at a restaurant in my hometown.) Add to that the fact that I found this older Rick Bayless cookbook in a used bookstore in Charlottesville, VA, and taaa-daaaaa - before I knew it I was eating cereal on my fish. (And to revisit the Rick Bayless issue from a previous blog post - yes, I did eventually see the tv show, and he is quite creepy. Damn good cookbook author, but as a show host he gives off somewhat of a stalker vibe. Blink, Rick! Blink!)

Crispy fish with tomatillo sauce, adapted from Mexico: One Plate at a Time, by Rick Bayless
Serves 2

Fish
1/4 cup flour
pinch of salt
1 egg, lightly beaten
1 1/2 cups smashed corn flakes (smash first, then measure)
2 5-6 oz. fish fillets (I used catfish), about 3/4 inch thich

vegetable oil, for frying

Sauce
1/2 pound tomatillos, husked and rinsed
1 serrano pepper, stem cut off, but otherwise left whole (use a jalepeno if serrano seeds are too hot for you and yours)
1 tablespoon olive oil
1/2 medium white onion, sliced
2 large garlic cloves, finely chopped
1 cup fish or chicken broth
1/3 cup chopped fresh cilantro

Fish preparation
Get out three flat bowls for breading the fish. Put the flour and salt in one, the egg in another and beat it with a little bit of water, and the smashed corn flakes in the third. (Note: you will probably want to smash the corn flakes with your hands rather than a food processor, because the machine will make the crumbs too fine.) Dredge the fish on both sides in the flour, then egg, then corn flakes. Really push the corn flakes into the fish. Repeat with the second fillet. Put them on a clean plate and refrigerate for at least an hour.

Sauce
Roast the tomatillos and chile on a baking sheet under the broiler for about 5 minutes on each side. You want them to blacken in spots, and they will probably also burst a little bit too. Take them out to cool for a few minutes before pureeing it all (along with the juices) in a food processor or blender.

Heat the tablespoon of olive oil in a medium skillet or saucepan over medium heat. Add the onion slices and cook until golden, about 7 minutes. Add the garlic, stir for about a minute, then add the tomatillo puree. Stirring constantly, cook until it is darker and thicker, about 3-4 minutes. Add the broth and half of the cilantro. Once it comes to a boil, turn down the heat to a simmer and let it cook and thicken for about 20 minutes. Season to taste with salt.

Fish, continued
In a large heavy skillet (cast iron is nice here), pour in vegetable oil to a depth of 1/4 inch. Heat it over a medium high flame until it is hot enough to instantly sizzle a cornflake. Cook the fish for about 2 minutes on each side, or until nicely browned. (The refrigeration helps the coating stick to the fish, which makes for easier cooking and flipping.) Drain the fillets briefly on paper towels, if desired.

Spoon half the sauce onto each plate, then top with a piece of fish. Garnish with the rest of the cilantro. I served this at my house with a simple romaine salad with a lime vinaigrette. (Bonus recipe! Lime vinaigrette: juice of one lime, salt, pepper, whisk in olive oil to taste.)

Elfing

December 24, 2009

Just totally not in time for Christmas, I decided to make a list of my Top Ten Favorite Kitchen Things. Not all are gadgets, and they certainly aren't all essential, so Things they are. And maybe if you're lucky, you celebrate Serbian Christmas (exchanging gifts on the Epiphany) or maybe the K-mart in your town is open for a couple of hours tomorrow. And also please enjoy this gratuitous picture of a fig and bacon salad.


Top 10 Kitchen Thingies
in no particular order
(and the links are for descriptive purposes only, I am not endorsing any particular brand - with three exceptions)

1) Mini-whisk. I convinced my husband's Aunt Joanie to buy one just the other day, and she says she's used it every day since. (It was only two days ago, though.)
Pluses: It's teeny-tiny, great for making salad dressing, whipping up one or two eggs, or combining small amounts of things. It's more efficient than a fork. Plus you can save your forks for food shoveling.
Minuses: It's teeny-tiny, so you'll still need a mama-sized whisk for things like polenta or fritatta.

2) Cast iron pan. It was non-stick before non-stick was cool.
Pluses: You don't use soap to clean it (water and a Chore Boy only, please!), it can go in the oven, and it gives THE best crisp crust on anything you sear or fry in it. And it's not that expensive - I think ours was $25 or $35. As a bonus: it adds iron to your diet! Not a problem for me, as I have a freakishly high iron content, but great for the anemic folk out there.
Minuses: It's really heavy. And if you're a germaphobe, the whole not using soap thing might bother you. (Let's just say that is not an issue in the House of Mango Hands.)

3) Kitchen Aid Mixer. Aka bridal shower gold.
Pluses: It can do everything! It has a whisk, bread hook, and just general mixing gadget. Plus you can buy any number of attachments. I have the meat grinder (thanks Walter! Stay safe in Iraq!), pasta plates, and sausage stuffer. I think you can also get an ice cream maker, French tickler, and juicer attachments.
Minuses: If you have a small apartment, it can be hard to find a place to store it. Also, they are pricey.

4) Immersion blender. I heard my friend Kaitlin (aka Bev)'s fiance's stepmother just bought one on a Mango Hands recommendation. (Hi Christine! I can't wait to meet you! Your daughters are beautiful!)
Pluses: If you like to make soup, you have to get an immersion blender. If you're making something you need to puree, you don't have to go through the fuss of dumping it in the blender in batches. You just stick it in, zshooch it around, and smooth soup it is! Bonus points if it comes with a mini-chopper attachment. (Most do.)
Minuses: Um, I can't think of any. Don't forget to unplug it before you wash it.

5) Garlic press. Great for keeping away vampires, or people who like Twilight too much.
Pluses: It does a damn good job of mincing garlic. I only bought one because America's Test Kitchen recommended it. It's great if you don't have anything else to chop but garlic, but you don't feel like getting a knife dirty. Most have a mince and slice feature. Get that kind.
Minuses: I am not the biggest fan of one-hit wonders (aka things with only one purpose), so if you feel the same it might not be for you. And it can be a pain in the butt to clean. My husband thinks it should go on the Top Ten Useless Kitchen Thingies, but if he wants to espouse that opinion he should get his own blog.

6) A giant cutting board. Put it next to the mini-whisk for laughs.
Pluses: It's giant. You can chop a bunch of different things and keep cute little piles, and then use them as you need them, as opposed to getting a bunch of little bowls dirty.
Minuses: It's giant. You'll need some counterspace. (But it's worth it.) And if it's wooden, you'll have to oil or wax it to keep it from drying out like a crusty old man.

7) A small salt bowl. I like to touch everything that goes in my food. Good think I usually wash my hands.
Pluses: It's small, it travels, and you can pinch exactly how much salt you're putting in your food.
Minuses: We spill it ALL THE TIME. There are piles of salt all over our house.

8) Salad spinner. I once saw this episode of Good Eats where Alton Brown suggested spinning your greens dry in the clothes dryer. This is much easier.
Pluses: Gets your greens nice and dry, plus it is fun for everyone to use. We have a collapsable model, which is great for our small space. If you eat green things, you should own one.
Minuses: Ours broke recently. It stopped spinning. Hence our new model. Please note that just spinning your greens doesn't clean them. You have to soak them in cold water, then scoop them (don't dump them! you'll just dump the sand and dirt in with them!) into the spinner.

9) Thin-slicer thingie. Don't spend load of money on a mandoline. This is just as good and cheaper. (This is the only link where I actually recommend you buy this exact model. You may, however, get a different color. Mine is lime green.)
Pluses: Perfect for consistent, very thin cuts of vegetables. I've used it for gratins, potato chips, and thin apple slices for brie, red onion, and apple baguettes.
Minuses: If you enjoy your fingertips, please don't lose the fingerguard. Or you WILL cut yourself.

10) Microplane zester. Also useful for zesting off your fingerprints in case the police are on your tail.
Pluses: It's the best way to zest citrus, plus great for ginger, parmesan cheese, and chocolate.
Minuses: See above.

Happy Elfing! If you have suggestions for other fabulous kitchen things, please leave comments.

Serves four

December 22, 2009

There is a family story from my mom's side that gets told every single time we eat pie. I was about to say that it is such a good story that it never gets old, but... Well, it is a really great story. My mom grew up with a fantastic pie-baker for a mother and a pie-lover for a father. There was pie after dinner every night. It wasn't even considered dessert, it was just the pie course. In fact, sometimes after pie, a person might inquire if there was dessert that night. As a family that had fresh-baked pie every night, they did not necessarily want leftovers, so the eight inch pie was always cut into four pieces - one for each person. When my mom started bringing my father home for dinner, my grandmother had to start making an extra pie, because no one could bear to have a smaller serving of pie. I wonder what that family of pie-lovers did with those extra three pieces? I'm sure they found a good home in someone's belly.


Speaking of pie-lovers, I happened to have married one. For many reasons I'm sad that my grandpa died before I met my husband, but just imagine the conversations they could have had about pie! My husband is also a FABULOUS baker and made this pie for my family for Thanksgiving. He made it the day before and well, the pie was just a little too tempting. This photo was taken about 10pm on the Wednesday before Thanksgiving.

Apple pie, from the Shelburne Farms cookbook
serves 4 (at my mom's childhood table) or 8 at a regular tabl
Makes a 10-inch pie 

2 10-inch homemade pie crusts (the Shelburne Farms cookbook has a great recipe, but I think any great pie crust will work just fine)
3 pounds apples (recommended: a variety of apples, including but not limited to the Northern Spy, Cortland, Empire, Fuji, Baldwin and Ida Red - or, ask your local orchard for a good variety for pie)
3/4 cup packed light brown sugar
1 teaspoon cinnamon
2-3 tablespoons flour
1/4 teaspoon salt
2 tablespoons butter, thinly sliced into pats
couple of tablespoons of milk
a sprinkle of sugar

Filling
Peel the apples and slice them VERY thinly into 1/8 inch slices. This may seem too sliver-y, but it makes for a fabulous pie. Toss them in a large bowl with the brown sugar, cinnamon, 2 tablespoons flour and salt. If the apples seem really juicy, add the extra tablespoon of flour. 

Preheat the oven to 425 degrees, with racks at the lowest and second lowest spots in the oven.

Roll out one of your homemade pie crusts, which was probably chilling in the fridge, to a diameter of about 13 inches. Gently transfer it to a 10-inch glass pie pan. Carefully layer the apple slices in the pie crust. It takes more time than just dumping the slices (and I've been known to mock my  husband for his placement technique) but it does make a difference. Just add one slice at a time, trying to add them with little to no space in between. Top the apples with the thin slices of butter. 

Roll out your top crust (also to a 13 inch diameter) and place on top of the pie. Crimp all along the edges with your fingers. Lightly brush the top of the pie with milk. Cut about 4-5 slits in the top of the pie. Sprinkle with some sugar. 

Pop the pie in the second lowest slot in the oven and let it bake for 25 minutes. Lower the temperature to 350, and move the pie to the lowest rack. If the edges are browned at this point, put some foil over the edges to prevent them from burning. Bake the pie for an additional 25-30 minutes, or until the crust is golden brown and the apples are tender when you poke through one of the vents with a skewer.

Let it cool before eating. And good luck trying to save it for a day. You probably should have made two pies.

You have to keep your head on a swivel

December 16, 2009

Every time I go to the grocery store, I like to peruse the meat section. I don't actually cook a lot of meat, but I still like to look. So the other day, I'm trolling the dead animal section of Whole Foods and I swear if my life was a TV show there would have been a bright light shining from the meat case and a chorus of angels singing "Ahhhhhhhh!!!!" There it was - a package of mismarked meat! I think when I first met my friend Emily G. she thought that all my boyfriend and I ever did was hunt for mismarked meats at area grocery stores. That is only what we did every weekend, Emily. We watched Matlock and darned socks during the week.

Anyway - back to the mismarked meat. It was a pound and a quarter of 93% lean free-range ground beef - marked at TWELVE CENTS. Yes, that would be one dime and two pennies. There were actually like five packages marked at that price. But since it was kind of like stealing (only kind of, it was technically and legally on sale for twelve cents), I only bought one package. Of course, when I got home, my husband couldn't figure out why I didn't buy ALL the packages. I like to think that I gave someone else the unadulterated joy of finding mismarked meat.

So what to do when life gives you mismarked meat? Make meatloaf!! (My god, I do love meatloaf.)

The best meatloaf ever, from Bon Appetit
Serves 4

1 tablespoon olive oil
1 package crimini or baby bella mushrooms, stems removed and finely chopped (this should be about 1.5 cups)
1/2 red onion, finely chopped
1 tablespoon fresh thyme, minced
1 tablespoon fresh sage, minced (you could use 3/4 teaspoon each of dried if you don't have fresh)

1 1/4 lb ground beef or ground buffalo (preferably mismarked to twelve cents)
1 egg, lightly beaten
3/4 cup tomato sauce, divided
1/2 cup panko
salt and pepper
1/4 teaspoon hot pepper flakes

Preheat the oven to 350 degrees.

Heat the olive oil in a large skillet over medium heat. Add the mushrooms and onions and cook until softened, about four minutes. Turn off the heat and stir in the thyme and sage. Let it cool slightly.

Dump the ground meat, egg, 1/2 cup of the tomato sauce, panko and salt and pepper in a large bowl. Add in the mushroom mixture, and VERY GENTLY, using your hands, combine everything together. (Have you ever had a really tough, not delicious meatloaf? It could be because the meat was squished and squashed to death in between someone's fingers.) Dump this on a sheet pan, and form a loaf-like shape.

Cook in the oven for 30 minutes. Meanwhile, combine the remaining 1/4 cup tomato sauce with the hot pepper flakes in a small bowl. Remove the loaf of meat from the oven, and cover the top with the tomato sauce mixture. Cook another 2o minutes. Let it rest for a few minutes before serving.

Sprinkles required

December 14, 2009

You know who I feel really sad for at Thanksgiving? Dogs. Not only are there all sorts of smells to be constantly aware of, ("Ooh, that smells good, I should go stand near it. And look sad.") but there are loads of people around who possibly don't know that the dog is not allowed to eat 1 lb. blocks of imported aged provolone. ("Perhaps if I sit here and paw at this leg, this stranger may give me all the food on that plate. Don't forget the sad eyes.") Multiple times during Thanksgiving Day at my parent's house someone would ask, "Where's Gus?" and my dad would respond, "Oh, he's in the kitchen, praying to the turkey." ("Oh please turkey, use those crisp yet juicy wings to fly off the counter and into my food dish!") So you can imagine the stress of the holiday on my parents' dog. And, the heartless creatures that we are, my husband and I had the gall to whip up something else that smelled delicious just three days later. I bring you:

Pumpkin Donuts! (Yes, this is spelled with an exclamation point.) from Bon Appetit
Makes 12-13 donuts and 12-13 donut holes, which was plenty for 6 people
Note: You have to start this 3 hours in advance, so I made up the dough the night before.

Donuts
1 3/4 cups flour
2 teaspoons baking powder
1/2 teaspoon salt
1/2 teaspoon cinnamon
1/4 teaspoon ginger
1/4 teaspoon baking soda
1/8 teaspoon nutmeg
pinch cloves
1/2 cup sugar
1 1/2 tablespoons butter, room temperature
1 egg (I used - 1/2 egg and 1 egg yolk)
1/2 teaspoon vanilla extract
1/4 cup plus 1/2 tablespoon buttermilk
1/2 cup canned pumpkin

Canola oil (for deep-frying)

Spiced sugar
1/2 cup sugar
2 teaspoons ground cinnamon
2 teaspoons ground nutmeg
(I had lots of this leftover, so you could probably cut it back some if you wanted to.)

Glaze
1 cup powdered sugar
whipping cream
sprinkles

Whisk together the flour and spices (through cloves.) Using an electric mixer, beat the sugar and butter in large bowl until blended. Beat in the egg and vanilla. Slowly beat in the buttermilk. Beat in the pumpkin in four additions. Using a rubber spatula, fold in the flour mixture in four additions. Cover with plastic; chill 3 hours.

In a small bowl, whisk together the ingredients for the spiced sugar.

In another small bowl, whisk together the powdered sugar and 2 tablespoons whipping cream. The glaze should be thick, but not too thick, so whisk in a few dribbles of whipping cream if you need to thin it out a little.

After their chilling time, roll out the donut dough on a lightly floured surface to about 1/2 inch thick. Using a 2 1/2 inch wide round cookie or biscuit cutter (if you don't have one, use a glass), cut out the donut rounds. Using a 1 inch round cookie cutter, cut out the donut holes. Repeat with remaining dough. (You can re-roll the scraps.)

Heat oil to a depth of 1 1/2 inches in a large, sturdy dutch oven or Fry-O-Later to 365-370 degrees. (You'll need a deep-frying thermometer if you're using a dutch oven.) When the oil reaches temperature, fry a few donut holes at a time. They'll take about 2 minutes, and you should turn them occasionally. Drain them on a rack over paper towels, but when they are still warm, toss them in the spiced sugar. (This is a great two-person job.) The donut rounds will take about 1 minute per side, so flip them halfway through. When they come out, drain on a rack, and then spoon some glaze over top. While the glaze is still warm, liberally apply sprinkles.

The recipe says to let the glaze set for 30 minutes before eating, but if you have that kind of willpower, I'm not sure we would get along that well. Happy Donutting!

Hoo-ha free

December 9, 2009

Sometimes food can be just about highlighting a really great, fresh, seasonal ingredient. Other (equally delicious) times it's about combining all kinds of hoo-ha to make something great. This dish, which is one of my husband's favorites, is the former. When we were in Scotland this summer, he ordered a fish sampler of sorts. (I tend to prefer a beer sampler, but to each his own.) It was three different fishes, simply broiled and served with a little lemon and butter. I'm still getting my bearings with fish and tend to like more hoo-ha with my finned friends. But this was really good, and the local rockfish really shined.

Oh, and I don't eat the skin, but if you feel bad about wasting it, mail it to my parents because their dog has skin issues and fish skin will make his coat lovely and shiny. Hi Gus! Tell them you can have extra snacks tonight!

Pan-seared rockfish, with a shout-out to Alice Waters "The Art of Simple Food"
Serves 2

Fish
2 pieces rockfish, skin on (Rockfish is a type of bass indigenous to the DC area. Um, I think.)
salt and pepper
olive oil

Sauce
lemon, zested and juiced
2 tablespoons olive oil
salt and pepper
2 tablespoons capers

Whisk together the lemon juice, zest, olive oil, salt, pepper and capers.

Choose a large heavy skillet (I used my trusty cast iron pan). Wrap the bottom of another pan (or a pot) in foil.

Season the not-skin side of the fish with salt and pepper. Heat a good amount of olive oil in the heavy skillet over medium-high heat. Once it's hot, put the fish in skin side down. Put the foil wrapped pan on top of the fish to weigh it down. Cook until the skin is brown and crispy, about 7 minutes. Once it is, flip the fish over and cook for about a minute or until it is just cooked through. Remove to a plate.

Re-whisk the lemon sauce and pour it into the hot pan for about 30 seconds. Spoon it over the fish, and prepare to enjoy a hoo-ha free meal.

Love affair, part two

December 3, 2009

There are several charming things about this recipe. The first is that the main ingredient is eggplant, which, as expounded upon here, delights me to no end. Another is that the recipe calls for said eggplant to be cut into "fingers." I just love that description. And they really do look more like fingers than, say, chicken fingers. I have no doubt this recipe would be less delicious if the eggplant was cubed. Thirdly, I once made it for my sister-in-law, who currently lives VERY far away (no, think even more far away than that) and when I make it I like to think of the brief time she lived VERY nearby.

Eggplant fingers with an herby curry, adapted from the "contemporary curries" section of 660 Curries
Serves 3-ish

1/4 cup packed cilantro
3 T packed mint
2 tablespoons chopped lemongrass (this is now readily available in jars)
1 teaspoon salt
4 cloves of garlic
2-4 green chiles (Thai, serrano or jalepeno), just the stems removed
zest of 1 lime
2 tablespoons oil
1 large, 2 medium, or several small eggplants, cut into fingers (think the shape of a french fry)
1 large tomato, chopped
1/2 cup chopped basil
1/2 cup chopped green onions

hot rice, for serving

Put the cilantro, mint, lemongrass, salt, garlic, chiles and lime zest in a food processor and pulse to a fine mince.

Heat the oil in a large skillet over high heat. Once it shimmers, add the eggplant fingers and the herb mixture. Cook 1-2 minutes. Add the tomato, and continue to cook until the eggplant is tender, about 10 more minutes. Watch the heat so you don't burn your eggplant. If you need to, add a tablespoon or so of water to prevent sticking.

Once the eggplant is done, turn off the heat and stir in the basil and green onions. Serve over rice. Think of Kate.